Skip to content
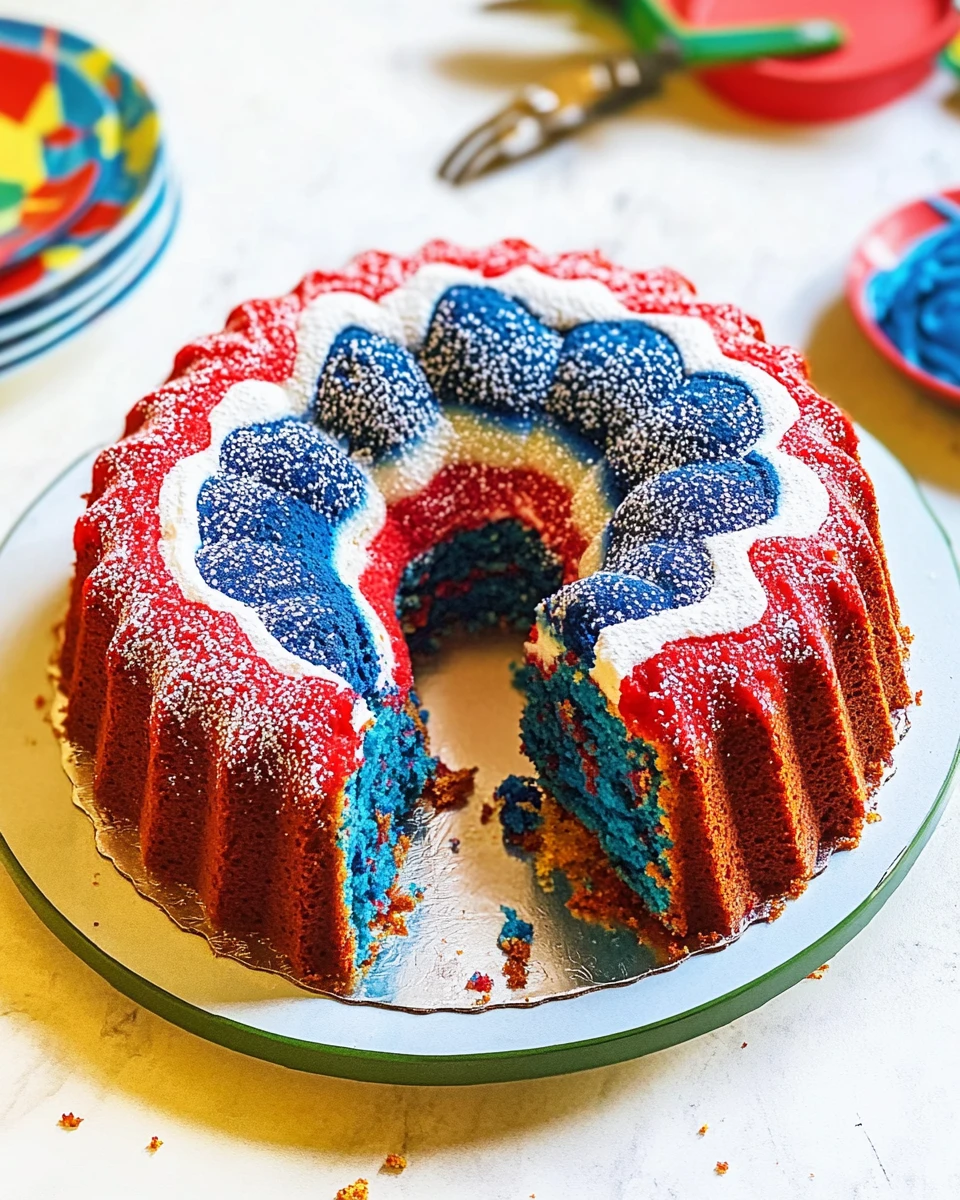
Creating a Red White & Blue Marble Cake is not just about celebrating a national holiday; it’s a joyful experience filled with laughter and love. Imagine gathering friends and family around the table, each slice revealing a beautiful swirl of colors. This cake balances flavors and textures impeccably, boasting a moist vanilla base that is light and fluffy. Every bite not only pleases the palate but also brings back fond memories of sun-soaked barbecues and festive gatherings. Whether it’s a Fourth of July bash or a summer birthday, this cake transforms any occasion into a memorable one. Plus, the process of making it is as enjoyable as savoring the final product. So, roll up your sleeves and get ready to whip up a delicious Red White & Blue Marble Cake that’ll have everyone asking for seconds!
Thank you for reading this post, don't forget to subscribe!Why This Recipe Works
Creating a Red White & Blue Marble Cake is about more than just a festive appearance; it’s a celebration of flavors and textures. By blending moist vanilla cake with vibrant colors, this recipe ensures that every slice is both visually stunning and delectable. The choice of ingredients works harmoniously to achieve a perfect balance of sweetness and richness, ideal for any patriotic occasion or summer gathering. The layers of color not only pop visually but also enhance the overall flavor profile, making each bite a new experience. Plus, the cake’s moistness contrasts beautifully with the airy, light texture. It’s a surefire way to impress your guests and elevate your dessert game.
Why You’ll Love This Red White & Blue Marble Cake
This Red White & Blue Marble Cake is not only a festive dessert, but it’s also incredibly easy to make and sure to impress. Whether you’re hosting a Fourth of July barbecue or a birthday party, this cake doubles as a centerpiece and a crowd-pleaser. The aesthetic appeal of the swirling colors coupled with the moist, fluffy texture makes it a favorite for both kids and adults. Each slice tells a story of celebration and joy, with a delicious vanilla flavor that never gets old. Imagine serving this beauty while your friends rave about its vibrant colors and rich taste. Trust me; once you experience a slice, you’ll understand why people keep coming back for more. Enjoy every moment of making and sharing this delightful creation!

Ingredients
- 1 cup unsalted butter, at room temperature
- 2 ½ cups granulated sugar
- 1 tablespoon pure vanilla extract
- 2 large eggs, at room temperature
- 4 large egg whites, at room temperature
- 1 cup buttermilk, at room temperature
- 3 cups cake flour
- 2 teaspoons baking powder
- ½ teaspoon salt
- Red food coloring
- Blue food coloring
Preparing Your Red White & Blue Marble Cake

Preheat and Prepare
First, preheat your oven to 350°F (175°C). While it warms up, generously grease and flour a 12-cup Bundt pan. This step is crucial for ensuring that your cake releases easily once it’s baked. Set the pan aside for now.
Combine Butter and Sugar
Now, in the bowl of a stand mixer fitted with a paddle attachment (or with an electric mixer), beat together the butter and sugar until the mixture is creamy and well combined. This step typically takes about 3-4 minutes. The result should be light and fluffy.
Add Eggs and Vanilla
Next, add the eggs and egg whites, one at a time. Mix well after each addition to ensure everything is properly blended. Stir in the vanilla extract until fully incorporated. Don’t rush this part; the eggs help add moisture and structure.
Mix in Buttermilk
Now, pour in the buttermilk and mix until everything is combined. This will yield a smooth batter. Take a moment to enjoy that rich, sweet aroma wafting through your kitchen!
Incorporate Dry Ingredients
Now it’s time to add the dry ingredients. Carefully add the cake flour, baking powder, and salt to the bowl. Mix on low speed just until the ingredients are incorporated. Be cautious not to over-mix; doing so can make the cake dense instead of fluffy.
Prepare the Colors
For the fun part, remove 1 ½ cups of the batter into a separate bowl for the red swirl. In another bowl, scoop out an additional 1 ½ cups of batter for the blue swirl. Add red food coloring to one bowl and blue food coloring to the other. Mix until the desired shades are achieved. This step adds excitement to your cake!
Layering the Batter
Using a ¼-cup measuring cup, drop one scoop of the plain batter into the center of the prepared Bundt pan. Follow it with a scoop of red batter, then a scoop of blue batter. Continue this layering, alternating colors, until all batters are used. Once you’re done, gently tap the pan on the counter to level out the batter. This step will create beautiful marbling in the finished cake.
Bake the Cake
It’s time to bake! Place the Bundt pan in the preheated oven and set a timer for 50-70 minutes. Check for doneness by inserting a wooden toothpick into the center; if it comes out clean, your cake is perfect.
Cool and Serve
Once baked, allow the cake to cool in the pan on a wire rack for about 15 minutes. After that, invert the cake onto the wire rack to cool completely before serving. Patience here is key; a cooled cake makes for clean, neat slices!
Serving Suggestions
This Red White & Blue Marble Cake is delightful as is, but if you want to dress it up, consider adding a light dusting of powdered sugar on top. A dollop of whipped cream or a scoop of vanilla ice cream can make it even better. For added flavor and color, serve it alongside fresh mixed berries. They’re not just pretty; they add a refreshing touch that perfectly complements the sweet cake.
Tips for Success
- Ensure your ingredients are at room temperature; this helps create a smooth batter.
- Avoid over-mixing once the dry ingredients are added. This keeps your cake light and fluffy.
- If you prefer sharper color definitions, carefully layer the batter instead of swirling it.
Variations
Get creative with your Red White & Blue Marble Cake! Use different food colorings to create swirls for other holidays or special events. Consider incorporating lemon zest into the batter for a refreshing twist. Adding chocolate chips or nuts into the batter can also provide extra flavor and texture that everyone will love.
Storage Tips
Store any leftover cake in an airtight container at room temperature for up to 3 days or in the refrigerator for up to a week. If you’re looking for longer storage, wrap the cake tightly in plastic wrap and aluminum foil before freezing. It’ll be just as delightful when you bring it back out to enjoy!
FAQs
1. Can I use a different type of cake flour?
Yes, you can substitute all-purpose flour, but the texture may be slightly different.
2. How can I make the cake more festive?
Top the cake with red, white, and blue sprinkles or fresh fruit to enhance its festive appeal.
3. Can I use a different pan?
Certainly! You can bake this in a regular round cake pan; just adjust the baking time as needed.
4. Is there a gluten-free option for this cake?
You can use a gluten-free cake flour blend to make the cake gluten-free.
5. How can I add more flavor to the cake?
Consider adding almond extract or citrus zest to kick up the flavor profile.
Creating this Red White & Blue Marble Cake is a delightful journey into festive baking that will resonate with your family and friends. With its vibrant colors and soft, moist slices, you’ll be bringing smiles, memories, and deliciousness to every gathering. This cake is more than just a dessert; it’s an experience worth sharing. Try this recipe, and watch it become a new favorite in your household!
Print
Red White & Blue Marble Cake
This Red White & Blue Marble Cake brings joy to any occasion with its beautiful swirl of colors and delightful vanilla flavor. It’s easy to make and sure to impress guests, making it a beloved treat for summer gatherings.
- Total Time: 1 hour 20 minutes
- Yield: 12 servings 1x
Ingredients
- 1 cup unsalted butter, at room temperature
- 2 ½ cups granulated sugar
- 1 tablespoon pure vanilla extract
- 2 large eggs, at room temperature
- 4 large egg whites, at room temperature
- 1 cup buttermilk, at room temperature
- 3 cups cake flour
- 2 teaspoons baking powder
- ½ teaspoon salt
- Red food coloring
- Blue food coloring
Instructions
- Preheat the oven to 350°F (175°C) and grease a 12-cup Bundt pan.
- Beat together the butter and sugar until creamy and light.
- Add eggs, egg whites, and vanilla extract; mix until well combined.
- Pour in the buttermilk and mix until a smooth batter forms.
- Incorporate cake flour, baking powder, and salt on low speed.
- Divide the batter for coloring: add red food coloring to one half and blue to another.
- Layer the batters in the Bundt pan, alternating colors.
- Bake for 50-70 minutes, checking for doneness.
- Allow to cool before inverting onto a wire rack.
Notes
Make sure all ingredients are at room temperature for best results.
Avoid over-mixing when incorporating dry ingredients to maintain fluffiness.
Store leftovers in an airtight container at room temperature for up to 3 days.
- Prep Time: 20 minutes
- Cook Time: 60 minutes
- Category: Dessert
- Method: Baking
- Cuisine: American
Nutrition
- Calories: 380
- Sugar: 30g
- Sodium: 180mg
- Fat: 20g
- Saturated Fat: 12g
- Unsaturated Fat: 8g
- Trans Fat: 0g
- Carbohydrates: 47g
- Fiber: 1g
- Protein: 4g
- Cholesterol: 70mg