Skip to content
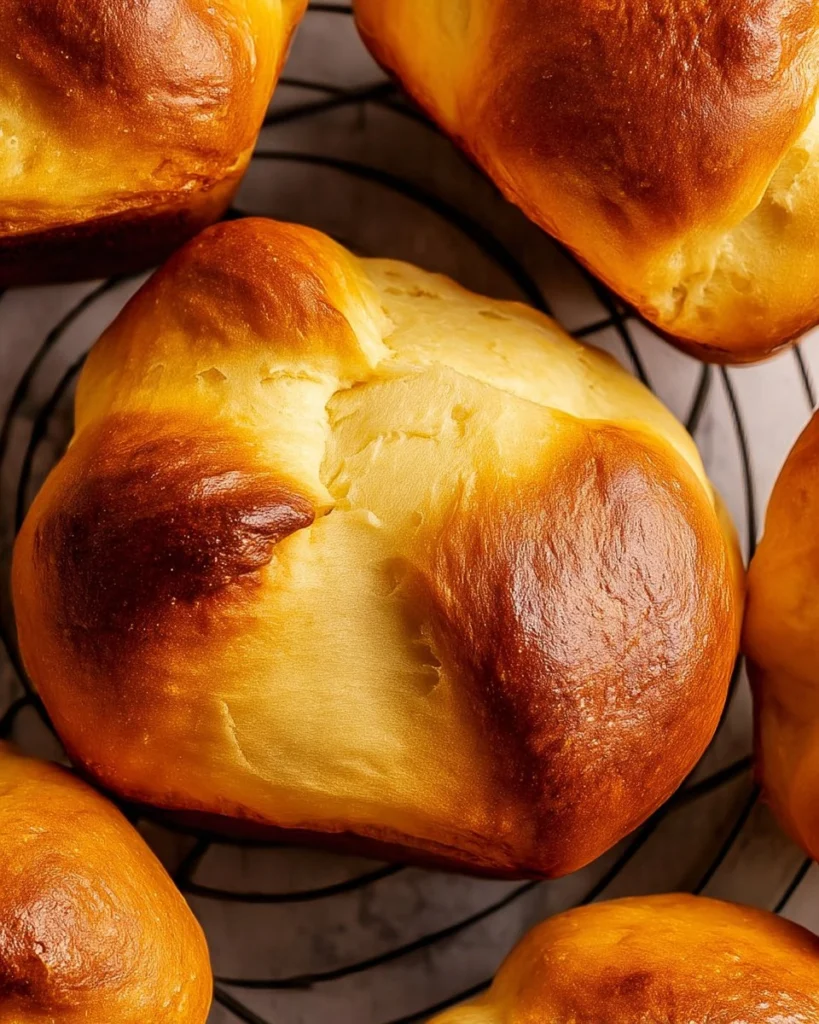
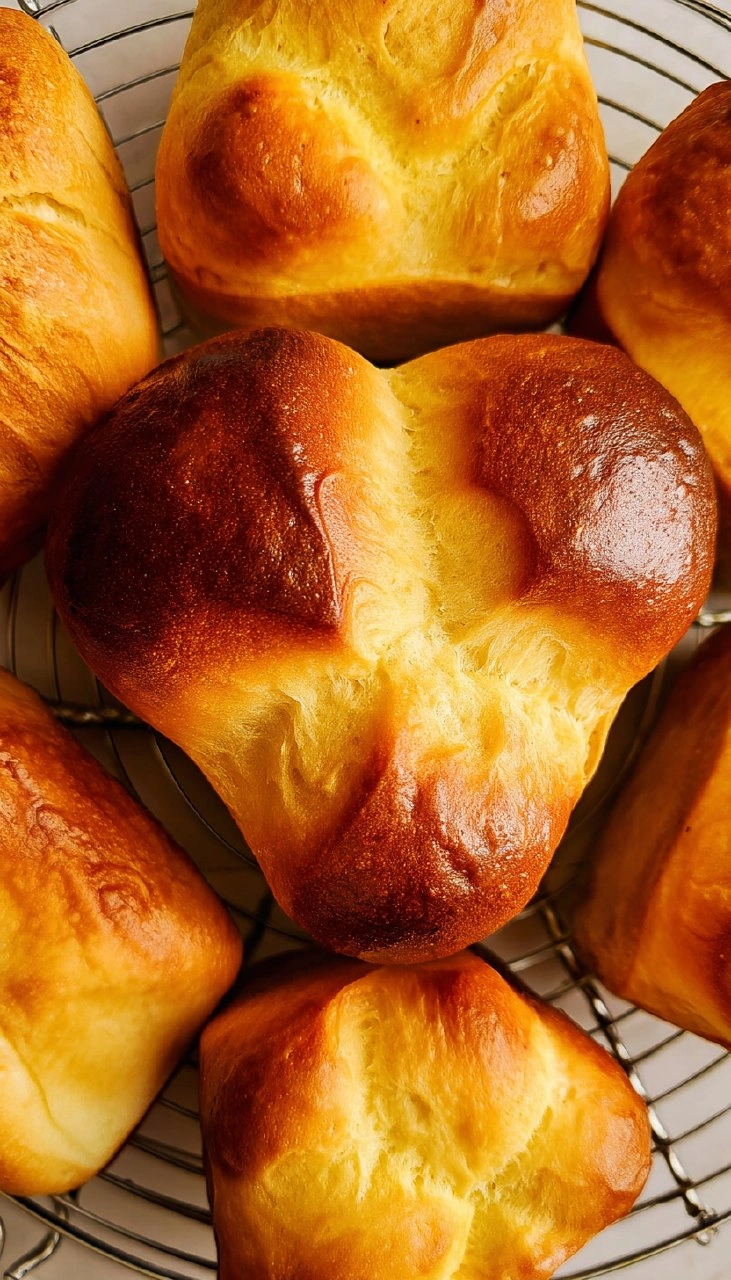
Cloverleaf rolls are a delightful staple in many homes, famed for their soft, pillowy texture and golden-brown crust. When baked, these small rolls have a charming shape where three dough balls combine in each muffin cup, creating just the right amount of crust to soft bread ratio. They are perfect for soaking up gravies, slathered in butter, or simply enjoyed warm right from the oven. The process of making cloverleaf rolls may seem lengthy, but trust me, the delicious aroma and the warm, buttery rolls that result are entirely worth the effort.
Thank you for reading this post, don't forget to subscribe!
I still remember the first time I made cloverleaf rolls. It was a chilly evening, and the smell of fresh bread filled the kitchen. My family gathered around the table, and as the warm rolls emerged from the oven, there was a palpable excitement. The cloverleaf rolls became a family favorite, and I’ve been making them ever since. Whether for a holiday dinner, a Sunday family meal, or simply because it’s a weekday that needs a little cheer, these rolls are sure to bring smiles all around. I invite you to bring this comforting recipe into your home and create your own cherished memories.
Why You’ll Love This Recipe
- Simple & Quick: In just about two hours from start to finish, you’ll have freshly baked rolls to enjoy.
- Irresistible Flavor: Soft, buttery rolls with a hint of sweetness that melt in your mouth.
- Eye-Catching Appeal: The fun cloverleaf shape makes them adorable on any dinner table.
- Flexible Serving: Perfect as a side dish for dinner, a snack, or breakfast with jam.
- Budget-Friendly: Made with basic pantry staples that won’t break the bank.
Ingredients You’ll Need
- 1 envelope active dry yeast: This is essential for making the rolls rise. Make sure it’s fresh for the best results.
- 4 tablespoons sugar (divided use): Adds sweetness and helps the yeast bloom. Brown sugar can be used for a caramel-like flavor.
- ¼ cup warm water: It should be around 110°F—too hot and it’ll kill the yeast.
- 4 tablespoons butter (diced): Provides richness. For a dairy-free option, use a plant-based butter.
- 1 cup milk: Whole milk gives the richest flavor, but any milk can work here, including dairy alternatives.
- 1 teaspoon salt: Helps balance the sweetness and enhances flavor.
- 2 eggs (beaten separately and divided use): Adds moisture and helps with the structure of the rolls. For an egg-free version, you can substitute with a flax egg or unsweetened applesauce.
- 3 ½ to 4 cups all-purpose flour (divided): Essential for dough structure. For gluten-free, try a 1:1 gluten-free flour blend.
How to Make Cloverleaf Rolls
- Prep the Oven: Preheat your oven to 400°F only towards the end of the second rise. Grease a 12-cup muffin tin and keep it ready. This is crucial as you want a non-stick surface for the rolls.
- Activate the Yeast: In your stand mixer bowl, stir together 1 envelope active dry yeast, 1 tablespoon of sugar, and ¼ cup warm water. Let this sit for about 5 minutes, until bubbly. This indicates the yeast is active and ready to work its magic.
- Make the Milk Mixture: In a small saucepan, combine 4 tablespoons of diced butter, 1 cup of milk, the remaining 3 tablespoons of sugar, and 1 teaspoon of salt. Heat this mixture gently until the butter melts and the mixture reaches 110°F. Be careful not to exceed 120°F! Once it’s warm, whisk in 1 beaten egg, giving the mixture a lovely golden hue.
- Knead the Dough: Add the milk mixture and 1½ cups of all-purpose flour to the yeast mixture. Use the dough hook on low speed to combine. Gradually add the remaining flour (around 3¾ cups total) until you get a soft and slightly tacky dough. Knead on medium speed for about 5-6 minutes until it’s smooth and elastic—this stretchy texture is key for fluffy rolls.
- First Rise: Transfer the dough into a greased bowl, turning to coat it. Cover with a clean kitchen towel and place it in a warm spot to rise for about 45-60 minutes, or until it doubles in size. This is the magic moment where the yeast works its charm!
- Shape the Rolls: Once the dough has risen, punch it down to release the air. On a clean surface, turn the dough out and divide it into about 36 walnut-sized balls. Nestle 3 balls into each muffin cup, forming the signature cloverleaf shape. Cover and let them rise again for another 20 minutes until they are puffy.
- Egg Wash and Bake: Brush the rolls with the remaining beaten egg for that beautiful, shiny crust. Bake in your preheated oven for 12 to 15 minutes or until they are golden brown and smell absolutely heavenly. Allow them to cool in the pan for roughly 5 minutes before transferring to a wire rack to cool completely.
Storing & Reheating
To store your delicious cloverleaf rolls, keep them in an airtight container at room temperature for up to 2 days. If you want to keep them longer, transfer them to the refrigerator where they will stay fresh for about a week. You can also freeze the rolls for up to 3 months—just ensure they’re well-wrapped to avoid freezer burn. To reheat, place the rolls in a 350°F oven for about 10 minutes until warm. The texture will soften slightly upon refrigeration but reheating brings back some of that fresh-baked goodness.
Chef’s Helpful Tips
- Always measure your flour correctly. Spoon it into the measuring cup and level it off for best results; too much flour can lead to dense rolls.
- Consider letting your eggs and milk come to room temperature before using them; it helps to create a more uniform dough consistency.
- Bake in the center of the oven for even cooking of the rolls.
- Use a kitchen thermometer to ensure your milk and water are at the right temperatures; this can be critical to yeast activation.
- If rolls are browning too quickly in the oven, cover them loosely with foil to prevent burning while they finish baking.
- Cloverleaf rolls can be made ahead! Simply shape and refrigerate them before the second rise, allowing them to rise overnight and bake fresh in the morning.
The joy of freshly baked cloverleaf rolls lies not just in their taste but in the warmth they bring to any meal. Perfectly soft, with just a hint of sweetness, they nestle snugly on your plate beside soups, stews, or salads. Don’t hesitate to experiment with flavors—add herbs or cheese to the dough, or try them with a honey butter glaze for some added sweetness. Enjoy every fluffy bite with family and friends, and I assure you these rolls will quickly become a beloved tradition in your home!
Recipe FAQs
Can I make cloverleaf rolls ahead of time?
Absolutely! You can shape the rolls and place them in the muffin tin, then cover and refrigerate them overnight. In the morning, allow them to rise for about 30 minutes before baking.
What can I serve with cloverleaf rolls?
These soft rolls are incredibly versatile. They pair wonderfully with hearty soups, stews, salads, or as a side for any main dish. They can even be served with jams or spreads for breakfast!
Why did my rolls not rise?
Several factors can affect yeast activation. Ensure your yeast is fresh and that your activation water was the correct temperature—too hot can kill yeast while too cold may not wake it up. Additionally, drafts or cold environments can hinder the rising process.
Can I freeze the leftover rolls?
Yes, cloverleaf rolls freeze beautifully. Allow them to cool completely, then wrap them tightly in plastic wrap or aluminum foil, and store in an airtight container or freezer bag for up to three months. Just thaw and reheat when you’re ready to enjoy them!
Print
Cloverleaf Rolls
These Cloverleaf Rolls are irresistibly soft and fluffy, made with simple ingredients like yeast, butter, and milk. Perfect for a quick dinner or as comfort food, these rolls are sure to delight your family and friends!
- Total Time: 3 hours 30 minutes
- Yield: 12 servings 1x
Ingredients
- 1 envelope active dry yeast
- 4 tablespoons sugar (divided use)
- ¼ cup warm water
- 4 tablespoons butter (diced)
- 1 cup milk
- 1 teaspoon salt
- 2 eggs (beaten separately and divided use)
- 3 ½ to 4 cups all-purpose flour (divided use)
Instructions
- Preheat your oven to 400°F just before the second rise. Grease a 12-cup muffin tin and prepare it toward the end of the first rise.
- In the bowl of a stand mixer, combine the yeast with 1 tablespoon of sugar and warm water (no warmer than 110°F). Let it sit for 5 minutes until bubbly.
- In a small saucepan, combine butter, milk, remaining sugar, and salt. Heat to 110°F and let the butter melt. Be careful not to exceed 120°F. Whisk in the egg.
- Add the milk mixture and 1-½ cups flour to the yeast mixture. Knead with the dough hook on low speed, gradually adding the remaining flour until a soft dough forms. Knead on medium speed for 5-6 minutes until the dough is soft and pliable.
- Transfer the dough to a greased bowl, turning it once to coat. Cover and let it rise in a warm place until doubled in size, about 45-60 minutes.
- Punch the dough down and turn it out onto a clean surface. Shape it into 36 walnut-sized balls and place 3 balls in each greased muffin tin cup. Cover and let them rise until puffy, about 20 minutes.
- Brush the rolls with the remaining beaten egg. Bake in the preheated oven for 12-15 minutes, or until golden. Let them cool in the pan for 5 minutes before transferring to a cooling rack.
Notes
The dough can be made ahead and frozen after shaping. Thaw and let it rise before baking.
For a richer flavor, consider adding herbs or garlic to the melted butter before brushing it on the rolls.
- Prep Time: 55 minutes
- Cook Time: 155 minutes
- Category: Breads
- Method: Baking
- Cuisine: American
Nutrition
- Serving Size: 1 roll
- Calories: 150
- Sugar: 2g
- Sodium: 150mg
- Fat: 5g
- Saturated Fat: 3g
- Unsaturated Fat: 1g
- Trans Fat: 0g
- Carbohydrates: 22g
- Fiber: 1g
- Protein: 4g
- Cholesterol: 40mg