Skip to content
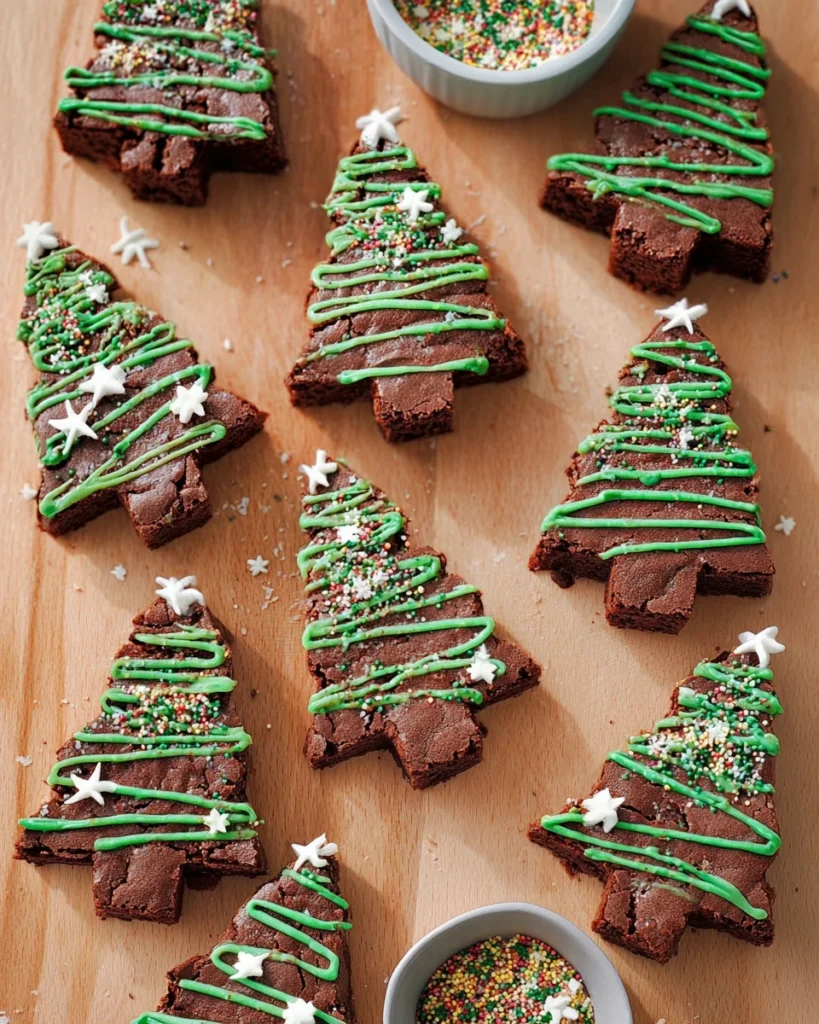
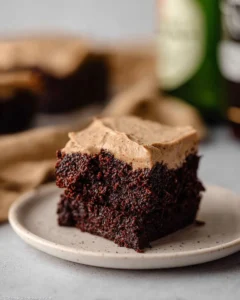
Christmas is such a magical time of year, filled with joy, laughter, and, of course, delicious treats! One recipe that’s sure to brighten up your holiday festivities is Christmas Tree Brownies. These treats aren’t just delightful to eat; they’re also a fun project to tackle with friends and family. Imagine your kitchen filled with giggles as kids help decorate chocolate trees with vibrant icing and sprinkles. Trust me, the joy of watching these brownies come to life is almost as delicious as tasting them! This recipe perfectly blends rich, fudgy chocolate with the whimsical spirit of the holiday season. So, let’s roll up our sleeves, grab some cute cookie cutters, and create these festive delights that everyone will adore. You’ll look forward to making new memories, while filling the air with the mouthwatering smell of freshly baked brownies—let’s get started!
Thank you for reading this post, don't forget to subscribe!Why This Recipe Works
This Christmas Tree Brownies recipe seamlessly fuses rich chocolate flavors with the festive spirit of the holidays. The combination of melted butter, cocoa powder, and eggs creates a fudgy texture that serves as the perfect canvas for decoration. Moreover, the simplicity of the recipe allows even novice bakers to create stunning treats that will impress family and friends. The step-by-step method ensures that the process is straightforward, making it easy for anyone to join in the fun.
Why You’ll Love This Christmas Tree Brownies
Not only are these brownies delicious, but they also provide a fun and interactive way to celebrate the holiday season. Decorating the brownies with your kids fosters creativity while bringing everyone together for a delightful activity. With their vibrant colors and festive sprinkles, these Christmas Tree Brownies are sure to become a cherished holiday tradition. The process is as enjoyable as the finished product, allowing everyone to express their unique style. Plus, nothing beats the combination of a rich chocolate brownie adorned with colorful icing and joyful decorations!

Ingredients
- 3/4 cup all-purpose flour
- 3/4 cup cocoa powder
- 3/4 teaspoon kosher salt
- 15 tablespoons unsalted butter, melted
- 1 1/2 cups granulated sugar
- 2 teaspoons vanilla extract
- 3 large eggs
- 1 cup powdered sugar
- 1-2 tablespoons milk
- Green food coloring (dye-free preferred)
- Holiday-themed sprinkles
Preparing the Brownies

Prepping the Oven and Ingredients
First things first, preheat your oven to 325°F (165°C). While it’s heating up, grab a medium bowl and combine the all-purpose flour, cocoa powder, and kosher salt. This step is essential, so set that mixture aside for later use.
Mixing the Batter
Now, let’s get to the fun part! Using a hand mixer or a standing mixer, blend the melted unsalted butter, granulated sugar, and vanilla extract until everything is smooth and creamy. Slowly incorporate the large eggs, adding them one at a time, and mix until fully combined. This provides the brownies with a rich base that’s oh-so-delicious.
Combining the Dry and Wet Ingredients
Next, carefully mix in the dry ingredients that you set aside earlier. It’s crucial to avoid over-mixing here; you want the batter to come together just enough to maintain that fudgy texture we all know and love.
Baking the Brownies
Once the batter is ready, pour it into a greased and parchment-lined 9×13 baking dish. Bake in your preheated oven for about 30 minutes. After baking, allow the brownies to cool completely in the dish before you start cutting into them. This cooling time is important; it helps them set perfectly.
Shaping the Christmas Trees
After cooling, it’s time for some fun! Use a Christmas tree-shaped cookie cutter to cut out tree shapes from the brownie slab. Start at the edges and cut close together to maximize the number of trees you can create. It’s super satisfying to see those delightful shapes form!
Decorating the Brownies
Creating the Icing
Time to get creative with the icing! In a small bowl, mix together the powdered sugar and 1-2 tablespoons of milk until you achieve a thick frosting consistency. Then, divide this icing into two bowls; keep one bowl plain for a snowy effect and add green food coloring to the other to represent the festive tree.
Piping the Icing
Now comes the really exciting part! Transfer both the green and white icing into separate plastic ziplock bags. Seal them up, removing excess air, and cut a small corner off each bag. With excitement bubbling over, carefully pipe zigzag patterns on the brownie trees with both colors. Let your imagination run wild!
Finishing Touches
As soon as you finish piping, it’s time to sprinkle on the festive holiday sprinkles. These little bits of color add a joyous finish to your Christmas Tree Brownies, making them simply irresistible!
Serving Suggestions
These delightful brownies can be served as a festive dessert at holiday parties or as a fun treat for family gatherings. Picture them elegantly displayed on a dessert table! Pair them with hot cocoa or spiced cider for the ultimate holiday experience. The combination of flavors will surely bring warmth to the winter chill.
Tips for Success
- Make sure that your butter is melted and not boiling; this can affect the outcome of your brownies.
- Use a sturdy cookie cutter for neat edges when shaping your brownies; it makes all the difference!
- Feel free to experiment with different colors of icing and sprinkles to match your holiday theme; your creativity will shine through.
Variations
To keep things fresh, consider these fun variations:
- Add peppermint extract to your icing mix for a minty twist.
- Incorporate chopped nuts or chocolate chips into the brownie batter for added texture and flavor.
- Swap the green icing for different colors to represent various holiday themes. Your brownies can reflect whatever festive spirit you desire!
Storage Tips
If you have any leftovers, store them in an airtight container at room temperature for up to 3 days. If you want to keep them longer, refrigerate to maintain their freshness. Just be sure to let them come back to room temp before serving again; no one wants a cold brownie!
Pairing Ideas
For those who truly love dessert, pair these Christmas Tree Brownies with a scoop of vanilla ice cream or a generous dollop of whipped cream. This combo creates a decadent experience! Enhance the holiday spirit with a cup of eggnog or a tasty peppermint mocha. Trust me, it’s a match made in holiday heaven!

FAQs
Can I make these brownies ahead of time?
Yes, you can bake the brownies a day in advance. Just store them covered at room temperature, and they’ll be ready for decorating!
What can I use instead of food coloring?
If you’d like a natural alternative, consider using matcha powder for a green color. Just keep in mind that it might slightly affect the flavor.
How do I prevent the brownies from sticking to the pan?
To avoid sticky situations, make sure to grease the pan well and line it with parchment paper. This makes for easy removal when you’re ready to cut.
Can I freeze Christmas Tree Brownies?
Absolutely! You can freeze them before decorating for up to 3 months. Just make sure they’re completely cooled and wrapped tightly to preserve freshness.
Are there gluten-free options for this recipe?
Yes, you can substitute all-purpose flour with a gluten-free flour blend. Just adjust as necessary for texture, and enjoy!
These Christmas Tree Brownies can easily become a beautiful centerpiece at your holiday celebrations. With their rich flavor, creative decorating, and interactive process, this recipe not only fills the kitchen with delightful aromas but also creates lasting memories with loved ones. Indulge in the joy of baking this festive season!
Print
Christmas Tree Brownies
These Christmas Tree Brownies are a perfect blend of rich chocolate and holiday spirit. A fun and interactive treat, great for family gatherings or festive parties!
- Total Time: 50 minutes
- Yield: 12 servings 1x
Ingredients
- 3/4 cup all-purpose flour
- 3/4 cup cocoa powder
- 3/4 teaspoon kosher salt
- 15 tablespoons unsalted butter, melted
- 1 1/2 cups granulated sugar
- 2 teaspoons vanilla extract
- 3 large eggs
- 1 cup powdered sugar
- 1–2 tablespoons milk
- Green food coloring (dye-free preferred)
- Holiday-themed sprinkles
Instructions
- Preheat oven to 325°F (165°C).
- Combine flour, cocoa powder, and salt in a medium bowl.
- Blend melted butter, sugar, and vanilla until smooth. Mix in eggs one at a time.
- Incorporate dry ingredients until just combined.
- Pour batter into greased 9×13 dish and bake for about 30 minutes.
- Cool completely before cutting into tree shapes.
- Mix powdered sugar with milk for icing, divide and add green coloring to one part.
- Pipe icing onto brownies and add sprinkles.
Notes
Ensure butter is melted but not boiling to achieve the right brownie texture.
Use a sturdy cookie cutter for neat shapes.
Experiment with different icing colors and sprinkles to match your holiday theme.
- Prep Time: 20 minutes
- Cook Time: 30 minutes
- Category: Dessert
- Method: Baking
- Cuisine: American
Nutrition
- Calories: 250
- Sugar: 20
- Sodium: 60
- Fat: 12
- Saturated Fat: 7
- Unsaturated Fat: 3
- Trans Fat: 0
- Carbohydrates: 33
- Fiber: 2
- Protein: 3
- Cholesterol: 35