Skip to content
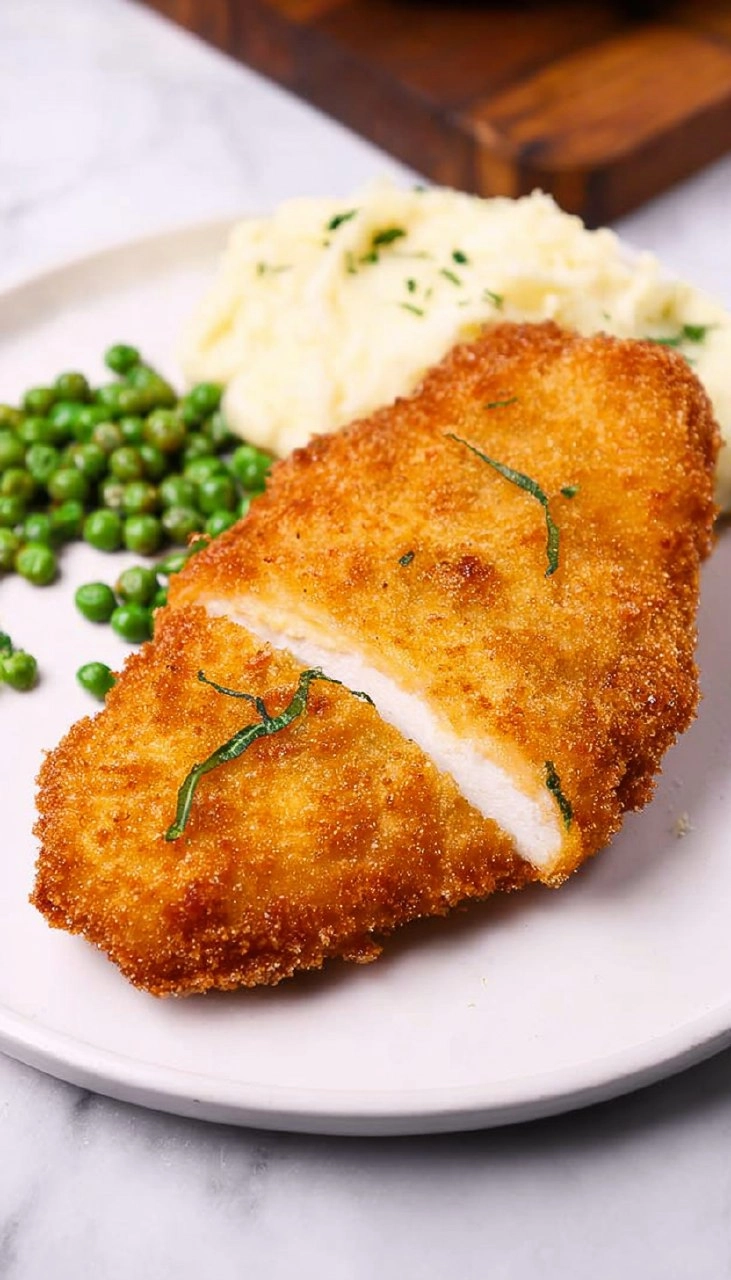
Chicken Kiev, a delightful fusion of tender chicken and rich, herb-infused butter, has been a family favorite for generations. With its golden, crispy exterior and oozy, flavorful filling that spills out when you cut into it, this dish truly defines comfort food at its best. I still vividly remember the first time I tried Chicken Kiev at a cozy family gathering; it was love at first bite. The satisfaction of homemade Chicken Kiev is unmatched, drawing the whole family together around the dinner table, eager to enjoy a special treat.
Thank you for reading this post, don't forget to subscribe!
This recipe is not just for special occasions; it’s a fantastic weeknight meal as well. With just a bit of prep, you can easily whip up this classic dish in under an hour. What’s more, it’s a budget-friendly recipe that doesn’t skimp on taste or elegance. So, if you’re looking to impress friends or simply satisfy that craving for something delicious, I warmly invite you to try making Chicken Kiev from scratch!
Why You’ll Love This Recipe
- Simple & Quick: You can have a delicious homemade Chicken Kiev on your table in about an hour.
- Irresistible Flavor: The combination of garlic and parsley in the butter infuses each bite with fragrant goodness.
- Eye-Catching Appeal: The golden, crispy crust makes this dish a showstopper for any dinner gathering.
- Flexible Serving: Perfect for special occasions or a satisfying weeknight meal; it pairs wonderfully with various sides.
- Diet-Friendly Options: You can easily adapt this recipe for gluten-free needs by swapping out regular flour and breadcrumbs.
Ingredients You’ll Need
- 6 tablespoons unsalted butter, softened: This forms the base for the delicious garlic-herb filling. Use high-quality butter for the best flavor and feel free to substitute with margarine in a pinch, but real butter gives the best taste.
- 1 large garlic clove, minced: Fresh garlic adds a robust flavor, but you can use garlic powder if you’re in a hurry.
- 2 tablespoons chopped fresh parsley, plus more to garnish: Fresh parsley brightens the dish. Dried parsley can be used in a pinch, but fresh elevates the taste significantly.
- ½ teaspoon salt: Enhances flavors; adjust to taste.
- ½ teaspoon ground black pepper: Adds a gentle heat; you can also use white pepper for a subtler flavor.
- 3 large boneless, skinless chicken breasts: Choose chicken that is fresh for best results; you can substitute with turkey if you’d like a variation.
- 2 eggs, beaten: Creates a lovely coating that helps the breadcrumbs adhere to the chicken perfectly.
- ½ cup all-purpose flour: Essential for the breading process; almond flour can be used for a gluten-free alternative.
- 2 cups panko bread crumbs: They create a wonderfully crispy crust. You can use regular breadcrumbs if panko isn’t available, but the texture will differ slightly.
- 2-3 cups vegetable or canola oil for frying: Use enough oil to fry without overcrowding. You can use olive oil for a different flavor, though it has a lower smoke point.
How to Make Chicken Kiev
-
Prepare the Garlic Butter: In a medium bowl, combine 6 tablespoons of softened unsalted butter, 1 minced garlic clove, 2 tablespoons of chopped fresh parsley, ½ teaspoon salt, and ½ teaspoon ground black pepper. Mash everything together with a fork until the butter is smooth, and set it aside.
-
Prepare the Chicken: Using a sharp knife, carefully slice the chicken breasts in half lengthwise while maintaining equal size and thickness. Next, cut a pocket into the side of each breast, aiming for about 2 inches wide and 3 inches long without cutting all the way through. Stuff each pocket with about 1 tablespoon of the garlic butter mixture and gently close and seal the opening by pinching it together. Repeat this with all chicken halves.
-
Set Up the Breading Stations: Using three medium bowls, prepare your dredging station. In the first bowl, pour in ½ cup of all-purpose flour. In the second, beat 2 eggs until thoroughly mixed. Finally, place 2 cups of panko bread crumbs in the third bowl.
-
Bread the Chicken: Take each stuffed chicken breast and first dredge it in the flour, shaking off any excess. Then, dip it into the egg mixture, ensuring it’s well-coated. Finally, roll it in the panko bread crumbs, pressing gently to adhere. Transfer each breaded piece to a platter while you repeat with the remaining chicken.
-
Fry Until Golden: Heat about ½ inch of vegetable or canola oil in a large deep skillet over medium heat. Once the oil reaches around 350°F (you can check this by tossing in a bread crumb — if it sizzles, the oil is ready), add the chicken in a single layer. Fry for about 4 minutes on each side, or until they are golden brown and reach an internal temperature of 165°F. If the chicken browns too quickly, reduce the heat to ensure it cooks evenly. Repeat to cook any remaining chicken.
-
Garnish and Serve: Sprinkle chopped fresh parsley over the top for a pop of color and serve immediately. Just a note: be careful when you cut into the chicken, as the melted butter will flow out, creating a deliciously decadent experience.
Storing & Reheating
For best results, store any leftover Chicken Kiev in an airtight container in the refrigerator for up to 3 days. If you wish to freeze it, wrap the chicken tightly in plastic wrap and then in aluminum foil. You can store it this way for up to 3 months. To reheat, bake at 350°F for about 15-20 minutes or until warmed through, though be mindful that the crispy coating may soften slightly after freezing.
Chef’s Helpful Tips
- Make sure your butter is at room temperature to mix easily and to ensure it fills the chicken pockets well.
- It’s essential to seal the chicken pockets tightly to prevent the filling from leaking during frying.
- For extra crispiness, consider double breading the chicken, dipping it back into the egg and breadcrumbs after the first round.
- If possible, let your chicken sit for a few minutes after frying. This allows the flavors to settle and makes it easier to cut into without all the butter spilling out at once.
- Feel free to experiment with the herbs in your garlic butter — chives or dill can add unique flavors, too.
Chicken Kiev is not just a meal; it’s an experience filled with flavor and delight. Making this dish allows you to savor the satisfaction of homemade goodness. Whether it’s for a comforting weeknight dinner or a fancy gathering, it’s sure to be a hit. I encourage you to give it a try and put your own spin on it! Don’t be afraid to adjust flavors and enjoy the process of creating something delicious from your kitchen.
Recipe FAQs
Can I make Chicken Kiev ahead of time?
Yes! You can prepare the chicken up to the frying step, store it in the fridge for about a day, or freeze it before cooking. Just make sure to thaw the chicken fully in the refrigerator before frying if you freeze it.
What can I serve with Chicken Kiev?
Chicken Kiev pairs wonderfully with a variety of sides, such as roasted vegetables, mashed potatoes, or a crisp salad. A light sauce or dressing can also complement it well.
Is it safe to eat leftovers?
Absolutely, but just be sure that any leftover chicken is properly stored in an airtight container. Heat it thoroughly before enjoying again, looking for an internal temperature of 165°F.
Can I bake Chicken Kiev instead of frying?
Certainly! If you prefer a lighter option, you can bake Chicken Kiev in a preheated oven at 375°F for about 25-30 minutes, or until crispy and the internal temperature reaches 165°F. Coat it with a spritz of oil to help it crisp up nicely!
Print
Chicken Kiev
Chicken Kiev features a tender, juicy chicken breast stuffed with a rich garlic butter filling that melts in your mouth. This easy-to-follow recipe offers a deliciously crispy exterior deliciously flavored by fresh parsley and garlic—perfect for a weeknight dinner or a special gathering.
- Total Time: 56 minutes
- Yield: 6 servings 1x
Ingredients
- 6 tablespoons unsalted butter, softened
- 1 large garlic clove, minced
- 2 tablespoons chopped fresh parsley, plus more to garnish
- ½ teaspoon salt
- ½ teaspoon ground black pepper
- 3 large boneless skinless chicken breasts
- 2 eggs, beaten
- ½ cup all-purpose flour
- 2 cups panko bread crumbs
- 2–3 cups vegetable or canola oil for frying
Instructions
- In a medium bowl, mix together the softened butter, minced garlic, parsley, salt, and pepper until smooth. Set aside.
- Cut each chicken breast in half lengthwise and create a pocket in each piece. Stuff each pocket with 1 tablespoon of the garlic butter mixture, then seal it.
- Prepare three bowls for breading: one with flour, one with beaten eggs, and one with panko crumbs.
- Coat each piece of chicken in flour, dip it in the egg, and then cover with panko crumbs. Place the breaded chicken on a platter.
- Heat about ½ inch of oil in a large skillet over medium heat. Once hot, cook the chicken in batches for about 4 minutes per side or until golden brown and cooked through (165°F internal temperature).
- Garnish with fresh parsley before serving.
Notes
Ensure the oil is hot enough before frying for a crispy texture.
Watch for the hot butter that may ooze out when cutting into the chicken.
- Prep Time: 20 minutes
- Cook Time: 36 minutes
- Category: Main Dishes
- Method: Frying
- Cuisine: European
Nutrition
- Serving Size: 1 piece
- Calories: 400
- Sugar: 1g
- Sodium: 350mg
- Fat: 21g
- Saturated Fat: 10g
- Unsaturated Fat: 7g
- Trans Fat: 0g
- Carbohydrates: 30g
- Fiber: 1g
- Protein: 19g
- Cholesterol: 150mg