Skip to content
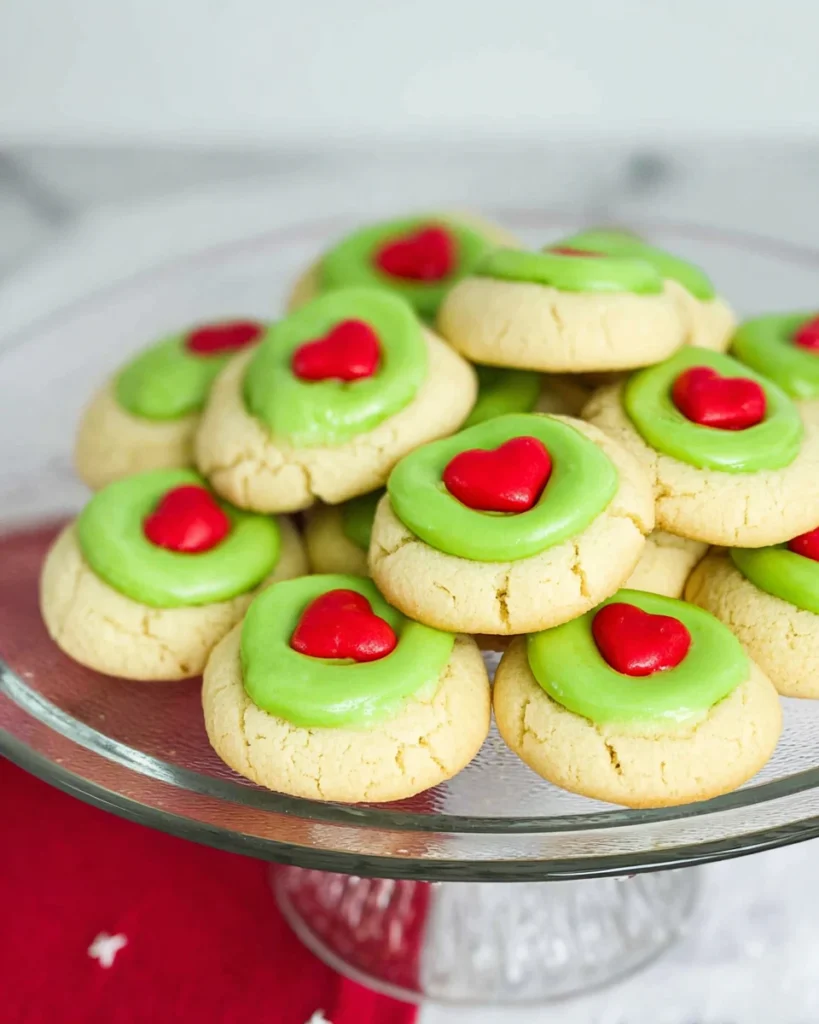
Grinch Thumbprint Cookies are not just your average cookies; they’re a festive treat that brings a sprinkle of cheer to any holiday gathering! If you want to create something that’s equally delicious and visually fun, these cookies are perfect for you. With their vivid green filling and a touch of love from tiny red heart sprinkles, they capture the whimsical spirit of the Grinch himself.
Thank you for reading this post, don't forget to subscribe!Baking these cookies is a delightful experience that transforms your kitchen into a holiday wonderland. Imagine the smiles on your friends’ and family members’ faces when they see these adorable cookies, each with a unique thumbprint that invites curiosity. So, gather your ingredients, channel your inner baker, and let’s embark on this sweet journey together. You’ll end up with treats that not only taste amazing but look stunning, making them perfect for gifting or sharing!
Why This Recipe Works
One of the best things about Grinch Thumbprint Cookies is how perfectly they balance flavors and textures. The combination of butter and sugar creates cookies that are soft and chewy. When you bite into one, it’s like a warm hug on a cold day. Plus, those thumbprints? They’re not just cute; they play a vital role. The unique technique allows for a delightful burst of Grinch-green filling, which is as tasty as it is fun.
Using cornstarch in the filling also achieves the ideal texture—smooth and stable—so every bite is an experience. With a touch of simple ingredients and a whole lot of joy, this recipe is truly a holiday winner!
Why You’ll Love This Grinch Thumbprint Cookies
When you think of holiday cookies, there’s something about these Grinch Thumbprint Cookies that makes them stand out. First off, they’re visually striking—those green centers against a perfectly baked cookie are simply irresistible. They’re not just cookies; they’re also an activity. Making these cookies with friends or family adds to the holiday spirit and brings everyone together in the kitchen.
The flavors? Oh, they elevate the cookie experience too. The sweet filling alongside a hint of saltiness from the cookie creates a delightful combination that dances on your taste buds. Whether you’re gifting them, decorating your dessert table, or just enjoying them as a festive snack, these cookies are sure to bring joy and smiles all around.

Ingredients
- 1 cup unsalted butter, softened
- 1/4 cup granulated sugar
- 1/4 teaspoon salt
- 1 large egg yolk
- 2 cups all-purpose flour
- 1 cup confectioners’ sugar
- 2 teaspoons milk (plus extra as needed)
- 2 teaspoons light corn syrup
- 1/2 teaspoon vanilla extract
- Green gel food coloring (to achieve desired color)
- Red heart sprinkles (for decoration)
How to Make Grinch Thumbprint Cookies

Preheat Oven and Prepare Baking Sheet
Before you start mixing ingredients, preheat your oven to 350°F (175°C). This ensures your cookies bake evenly. While the oven warms up, take a moment to line a baking sheet with parchment paper to keep your cookies from sticking.
Make the Cookie Dough
Start by whisking together the all-purpose flour and salt in a medium bowl until well mixed. Next, grab your stand mixer fitted with a paddle attachment. Cream together the softened butter and granulated sugar until the mixture looks light and fluffy—this should take about 2-3 minutes. Then, mix in the egg yolk and vanilla extract, making sure everything is nicely blended.
Combine Dry Ingredients
Now, it’s time to bring it all together. Gradually add the flour mixture to the butter-sugar combo, mixing until you see no dry bits left. Once fully blended, scoop tablespoon-sized portions of the dough and roll them into little balls. Place these on your prepared baking sheet, giving enough space between each ball.
Create Thumbprints
This part is super fun! Using the handle of a wooden spoon or your finger, gently press down in the center of each dough ball to create a lovely thumbprint. This little dent is where all the magic happens later!
Bake the Cookies
Pop your baking sheet in the preheated oven and bake the cookies for about 8-10 minutes. Once they’re just turning lightly golden brown, take them out, press down in the center of each cookie again, and return them to the oven for an additional 10-12 minutes. This step creates the perfect nest for your filling. Afterward, let them cool on the baking sheet for about 2-3 minutes before moving them to a wire rack.
Prepare the Grinch Filling
While the cookies cool, let’s whip up the vibrant filling! In a medium bowl, combine confectioners’ sugar, light corn syrup, vanilla extract, and 2 teaspoons of milk. Mix everything until it’s smooth and creamy. If you find it’s too thick, add a little extra milk, half a teaspoon at a time, until you reach that perfect consistency. Finally, add green gel food coloring until your filling shines with the brightest Grinch green you desire!
Fill the Cookies
Once your cookies have cooled completely, it’s time to fill those thumbprints! Spoon in the green Grinch filling, filling each thumbprint to the brim. Finish off each cookie with a small red heart sprinkle right in the center. It’s all about those lovely little details!
Allow Filling to Set
After filling, let the cookies sit uncovered for a bit until the filling has set. Once they’re ready, store your Grinch Thumbprint Cookies in an airtight container. Try to resist eating them all at once!
Serving Suggestions
These cookies are perfect enjoyed with a glass of cold milk or a warm cup of hot cocoa. They also make a fabulous addition to any festive dessert platter, adding a pop of color and flavor that guests will love.
Tips for Success
To ensure everything mixes well, make sure your butter is at room temperature—it really makes a difference in texture. For an eye-catching filling, using gel food coloring is key. It gives you that vibrant color without making the mixture runny.
Variations
Feeling adventurous? You can switch up the filling colors for different occasions. For instance, use red for Valentine’s Day or pastel colors for springtime celebrations! If you want to add a refreshing twist, consider mixing peppermint extract into the filling. It’s sure to be a winner!
Storage Tips
Store your Grinch Thumbprint Cookies in an airtight container at room temperature. They’ll stay fresh for up to a week—if they last that long!

FAQs
What is the best way to store Grinch Thumbprint Cookies?
Store them in an airtight container at room temperature to keep them fresh and tasty.
Can I freeze these cookies?
Definitely! You can freeze both unbaked and baked cookies. Just ensure they’re sealed well to prevent freezer burn.
How do I make them less sweet?
To balance the sweetness, reduce the amount of confectioners’ sugar in the filling or add a pinch of salt.
Can I use different sprinkles?
Absolutely! Any festive sprinkles that match your holiday theme would be perfect.
What if my filling is too runny?
If it’s too runny, simply add more confectioners’ sugar until you reach the desired thickness.
These Grinch Thumbprint Cookies capture everything that’s joyful about the holiday season. Not only are they delicious—each bite is a memory waiting to happen. So gather your family, enjoy some quality time together in the kitchen, and make these delightful cookies. They’re sure to bring smiles to faces young and old alike this holiday season!
Print
Grinch Thumbprint Cookies
These Grinch Thumbprint Cookies bring festive cheer to any occasion with their colorful green filling and adorable heart sprinkles. They’re easy to make and perfect for sharing!
- Total Time: 50 minutes
- Yield: 24 cookies 1x
Ingredients
- 1 cup unsalted butter, softened
- 1/4 cup granulated sugar
- 1/4 teaspoon salt
- 1 large egg yolk
- 2 cups all-purpose flour
- 1 cup confectioners' sugar
- 2 teaspoons milk (plus extra as needed)
- 2 teaspoons light corn syrup
- 1/2 teaspoon vanilla extract
- Green gel food coloring (to achieve desired color)
- Red heart sprinkles (for decoration)
Instructions
- Preheat oven to 350°F (175°C) and line a baking sheet with parchment paper.
- Mix flour and salt in a bowl. Cream together butter and sugar until light and fluffy.
- Add egg yolk and vanilla, blending well. Gradually add flour mixture until combined.
- Roll tablespoon-sized dough into balls and place on the baking sheet.
- Create thumbprints in the center of each ball using a spoon handle or finger.
- Bake for 8-10 minutes, then press down centers again and bake for 10-12 more minutes.
- Cool cookies on the sheet for 2-3 minutes before moving to a wire rack.
- Prepare filling by mixing confectioners' sugar, corn syrup, vanilla, and milk until smooth; add food coloring.
- Fill cooled cookies with the green filling and decorate with red heart sprinkles.
- Allow filling to set before storing in an airtight container.
Notes
Ensure butter is at room temperature for better texture.
Experiment with different colored fillings for various occasions.
Store cookies in an airtight container at room temperature for freshness.
- Prep Time: 30 minutes
- Cook Time: 20 minutes
- Category: Dessert
- Method: Baking
- Cuisine: American
Nutrition
- Calories: 120
- Sugar: 8
- Sodium: 50
- Fat: 6
- Saturated Fat: 4
- Unsaturated Fat: 2
- Trans Fat: 0
- Carbohydrates: 15
- Fiber: 0
- Protein: 1
- Cholesterol: 20