Skip to content
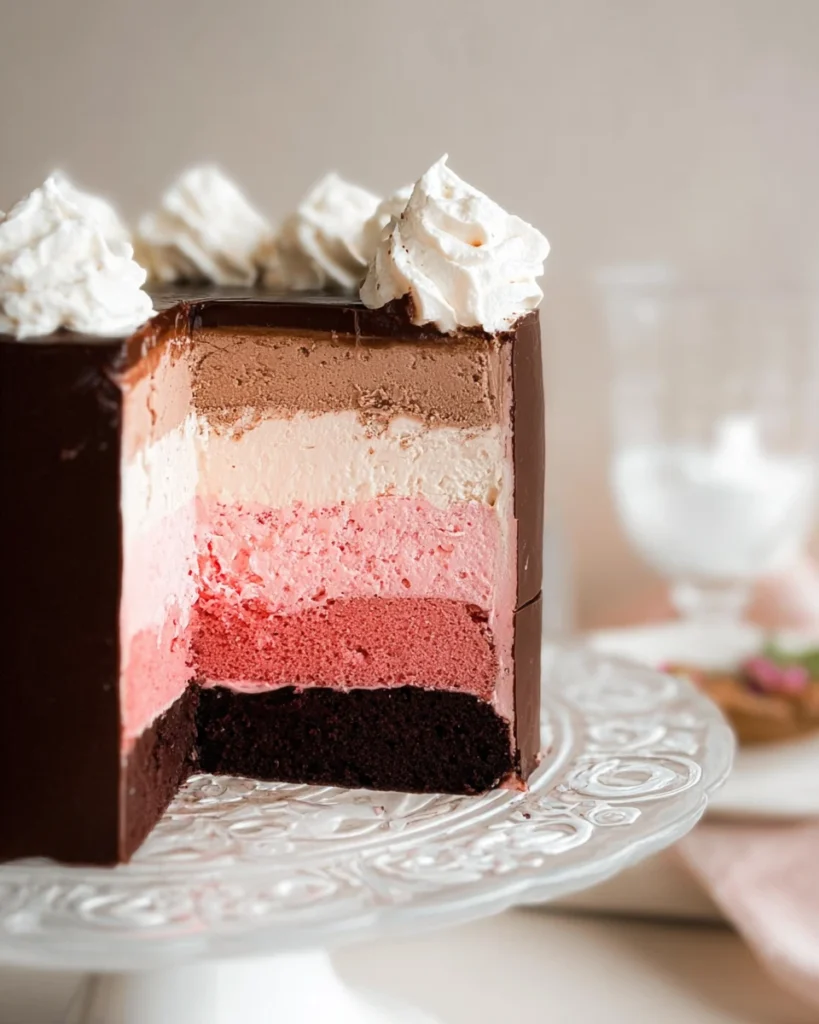
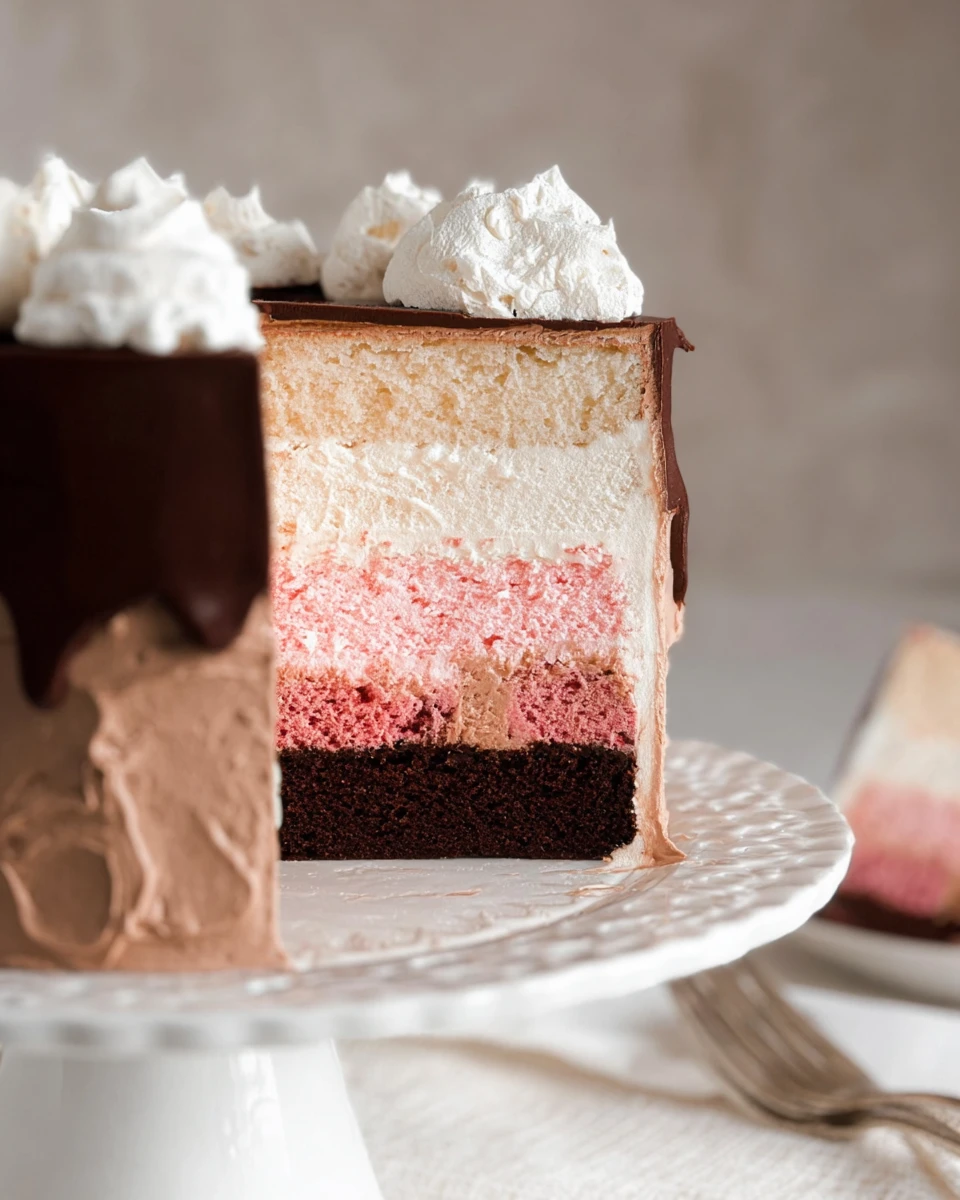
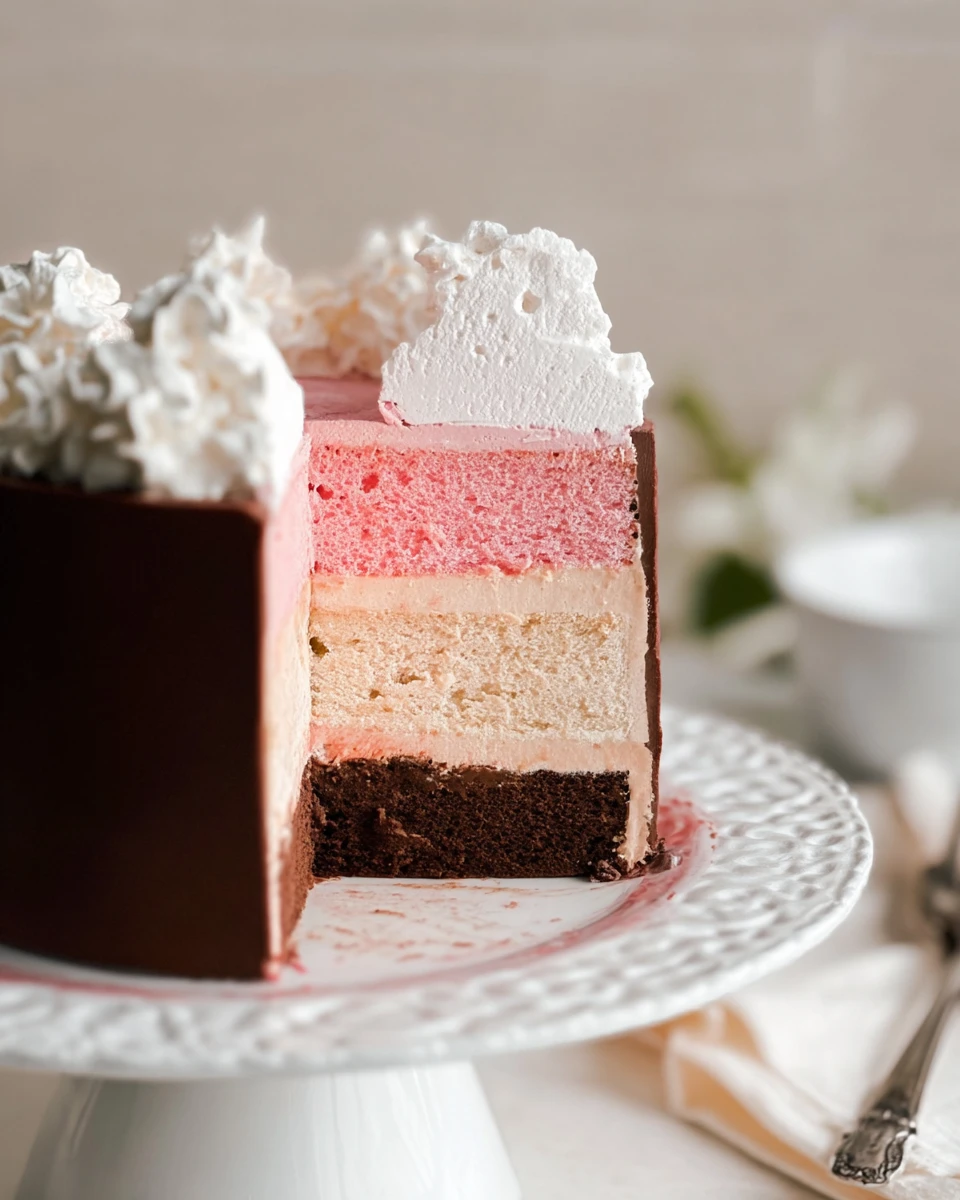
High Altitude Neapolitan Cake is a sweet treat that satisfies cravings while being visually stunning. Imagine a cake layered with rich chocolate, fresh strawberry, and classic vanilla flavors! Whether you’re gearing up for a birthday celebration, a special gathering, or just treating yourself, this cake stands tall among the rest. It’s bright, cheerful, and each layer brings something unique to the table. As you slice into this gorgeous creation, you’ll see the beautiful stripes revealing a delicious story of flavors. Plus, the playful ice cream cone topper adds a whimsical touch that kids and adults alike will adore. High-altitude baking can be tricky, but don’t worry! This recipe has been specially crafted to ensure your cake turns out perfect every time you make it. Let’s roll up our sleeves and get started on this delightful journey together!
Thank you for reading this post, don't forget to subscribe!Why This Recipe Works
High altitude baking presents unique challenges, including lower air pressure, which can affect the rise and texture of baked goods. This High Altitude Neapolitan Cake recipe incorporates specific adjustments to ensure perfect layers of rich chocolate, fresh strawberry, and classic vanilla, making it a delightful treat that stands tall. You’ll find that ingredients behave differently at higher elevations, making certain elements like flour and liquid ratios crucial for creating the best texture. Adjusting baking times and temperatures further ensures that your creation bakes evenly.
Why You’ll Love This High Altitude Neapolitan Cake
This whimsical cake not only satisfies your sweet tooth but also brings a splash of color and joy to any occasion. Each layer offers its unique flavor profile, while the striped buttercream and ice cream cone topper add a playful touch. Imagine cutting into this vibrant cake and seeing those beautiful layers! It’s perfect for birthdays, celebrations, or simply a treat for yourself! Trust me, once you serve this cake, everyone will be talking about it.
Ingredients
- ½ recipe Vanilla Cake
- ½ recipe Vanilla Buttercream
- ½ recipe Strawberry Cake
- ½ recipe Strawberry Buttercream
- 3-4 drops red or pink gel food coloring
- ½ recipe Chocolate Cake
- ½ recipe Chocolate Buttercream
Preparing the Cakes
Preheat and Prepare the Pans
First things first, preheat your oven to 350°F. While that’s heating up, grab three 8-inch cake pans and spray the bottoms with non-stick spray. Make sure to coat them well so your cakes slide right out later.
Creating the Cake Batters
Next, you’ll want to prepare your cake batters. Start with a half recipe of Vanilla Cake for your first layer. For the second layer, prepare a half recipe of Strawberry Cake, and don’t forget to add the red or pink gel food coloring to achieve that perfect pink hue. Finally, get your half recipe of Chocolate Cake ready.
Baking the Cakes
Time for the oven! Place your cake pans on the center rack and bake the cakes for about 28-30 minutes. You’ll know they’re ready when a cake tester comes out clean. Once they’re done, set the pans on a cooling rack. It’s important to cover them loosely with a clean kitchen towel to let them cool completely.
Advanced Cooling
If you made the cakes in advance, that’s totally fine! Just allow them to cool slightly, turn them out onto a wire rack, and wrap them tightly in plastic wrap. They will be okay at room temperature for a day, or you can freeze them for 3-6 months for future baking adventures.
Making the Buttercream
Creating Flavored Buttercreams
Let’s get into the sweetness! Prepare half recipes of Vanilla, Strawberry, and Chocolate Buttercream. As you’re mixing, follow the recipes closely to get that perfect creamy texture. Once done, cover each bowl with plastic wrap to keep them fresh until you’re ready to frost your cake.
Assembling the Cake
Leveling the Cakes
Now, it’s time to assemble this beauty! Carefully level the tops of your cooled cakes to create flat surfaces. This step is super important for even stacking, so take your time.
Layering the Cakes
Start by placing the vanilla cake on a cake board. Spread a layer of vanilla buttercream over the top, about 1/8-1/4 inch thick, and a thin coat around the sides. Next, place the strawberry cake on top, frosting it with strawberry buttercream. Finally, place the chocolate cake on top and frost it with chocolate buttercream.
Smoothing the Frosting
Grab a bench scraper and smooth the sides of the cake, scraping away any excess frosting for a nice finish. Now, pop the cake into the refrigerator for about 30 minutes to help it set.
Final Coat of Buttercream
For that polished look, use either an icing spatula or piping bags to apply a fresh coat of buttercream around the cake. Take your time to achieve clean lines and great coverage.
Creating the Ice Cream Cone Topper
Prepare the Ice Cream Cone
Using a sugar cone, hold it upright in a small jar. Now for the fun part—take your extra frosting and chill it slightly, then scoop out generous dollops to create scoops for the cone.
Attaching the Topper
To attach your topper, insert a wooden skewer through the scoops of frosting and into the cone. Then, securely press the skewer into the cake’s center on top. Voilà! Your whimsical ice cream cone topper is ready to go.
Serving Suggestions
When it’s time to serve, slice into this stunning cake and prepare to be wowed! It pairs beautifully with fresh fruit or even a scoop of vanilla ice cream for an extra delicious treat.
Tips for Success
- Make sure all ingredients are at room temperature. This will help with better mixing and fluffy cake layers!
- Use gel food coloring for vibrant shades without affecting your batter’s consistency.
- If you have leftover cake layers, consider freezing them for future cake cravings.
Variations
Feel free to experiment with flavored buttercreams using different extracts, such as almond, coconut, or lemon, to enhance the flavors of your cake. Additionally, you might want to substitute the chocolate layer with a coffee-flavored cake for a sophisticated twist.
Storage Tips
To keep this cake fresh, store it in the refrigerator. It’s especially important with the sugary buttercream and ice cream cone topper. An airtight container works best, and it will stay delicious for up to 4 days.

FAQs
1. Can I prepare the cake layers in advance?
Absolutely! Bake the layers ahead of time, let them cool, wrap them well, and store them in the freezer for 3-6 months.
2. How can I prevent my cakes from doming?
Using the right oven temperature and mixing your batter correctly will help to achieve flat cake layers.
3. What is high altitude baking?
High altitude baking refers to making adjustments to recipe techniques and ingredients due to lower air pressure, which impacts moisture and rising.
4. Can I replace cake flour with all-purpose flour?
Yes! Just remember to sift the all-purpose flour with some cornstarch to mimic the texture of cake flour.
5. How can I achieve vibrant cake colors?
Gel food coloring is your best friend here! It provides bold colors without changing the texture of the batter.
This High Altitude Neapolitan Cake is an exciting and delicious dessert that will delight your taste buds and impress your guests. By following these detailed instructions and tips, you’ll create a showstopper that not only looks fantastic but also tastes divine. Enjoy every beautiful, colorful bite!
Print
High Altitude Neapolitan Cake
This delightful cake combines rich chocolate, fresh strawberry, and classic vanilla flavors, making it a perfect centerpiece for any celebration or a sweet indulgence for yourself. The fun ice cream cone topper adds a whimsical touch that everyone will appreciate.
- Total Time: 1 hour
- Yield: One 3-layer cake 1x
Ingredients
- ½ recipe Vanilla Cake
- ½ recipe Vanilla Buttercream
- ½ recipe Strawberry Cake
- ½ recipe Strawberry Buttercream
- 3–4 drops red or pink gel food coloring
- ½ recipe Chocolate Cake
- ½ recipe Chocolate Buttercream
Instructions
- Preheat oven to 350°F and prepare three 8-inch cake pans with non-stick spray.
- Prepare the Vanilla, Strawberry (with food coloring), and Chocolate cake batters.
- Bake the cakes for 28-30 minutes until a cake tester comes out clean, then cool them completely.
- Make the Vanilla, Strawberry, and Chocolate buttercreams and keep covered.
- Level the tops of each cake for even stacking and assemble with alternating layers and frosting.
- Smooth the frosting and refrigerate for 30 minutes.
- Apply a final coat of buttercream for a polished look.
- Prepare the ice cream cone topping and attach to the cake.
- Serve with fresh fruit or vanilla ice cream.
Notes
Ensure all ingredients are at room temperature for best mixing.
Use gel food coloring for vibrant shades that won’t alter batter consistency.
Leftover layers can be frozen for later use.
- Prep Time: 30 minutes
- Cook Time: 30 minutes
- Category: Dessert
- Method: Baking
- Cuisine: American
Nutrition
- Calories: 320
- Sugar: 24
- Sodium: 150
- Fat: 15
- Saturated Fat: 7
- Unsaturated Fat: 6
- Trans Fat: 0
- Carbohydrates: 42
- Fiber: 1
- Protein: 3
- Cholesterol: 40